Adding Web Content to a Rocky.js JavaScript Watchface
This page contains some instructions that are different if you're using CloudPebble or if you're using the SDK locally on your computer.
Select whether you're using CloudPebble or the SDK below to show the relevant instructions!
 Showing instructions for CloudPebble. Not using CloudPebble?
 Showing instructions for the SDK. Using CloudPebble?
Device Compatibility
Rocky.js requires Pebble OS v4.x and therefore will not support Pebble Classic or Pebble Steel.
In the previous tutorial, we looked at the process of creating a basic watchface using Pebble's new JavaScript API.
In this tutorial, we'll extend the example to add weather conditions from the Internet to our watchface.
We'll be using the JavaScript component pkjs, which runs on the user's mobile
device using PebbleKit JS. This pkjs component can be
used to access information from the Internet and process it on the phone. This
pkjs environment does not have the same the hardware and memory constraints of
the Pebble.
First Steps
The first thing we'll need to do is add a new JavaScript file to the
project we created in Part 1. Click
'Add New' in the left menu, set the filename to index.js and the 'TARGET' to
'PebbleKit JS'.
The first thing we'll need to do is edit a file from the project we
created in Part 1. The file is
called /src/pkjs/index.js and it is the entry point for the pkjs portion
of the application.
This pkjs component of our application is capable of sending and receiving
messages with the smartwatch, accessing the user's location, making web
requests, and an assortment of other tasks that are all documented in the
PebbleKit JS documentation.
Although Rocky.js (watch) and
pkjs(phone) both use JavaScript, they have separate APIs and purposes. It is important to understand the differences and not attempt to run your code within the wrong component.
Sending and Receiving Messages
Before we get onto the example, it's important to understand how to send and
receive messages between the Rocky.js component on the smartwatch, and the
pkjs component on the mobile device.
Sending Messages
To send a message from the smartwatch to the mobile device, use the
rocky.postMessage method, which allows you to send an arbitrary JSON
object:
// rocky index.js
var rocky = require('rocky');

// Send a message from the smartwatch
rocky.postMessage({'test': 'hello from smartwatch'});
To send a message from the mobile device to the smartwatch, use the
Pebble.postMessage method:
// pkjs index.js

// Send a message from the mobile device
Pebble.postMessage({'test': 'hello from mobile device'});
Message Listeners
We can create a message listener in our smartwatch code using the rocky.on
method:
// rocky index.js

// On the smartwatch, begin listening for a message from the mobile device
rocky.on('message', function(event) {
  // Get the message that was passed
  console.log(JSON.stringify(event.data));
});
We can also create a message listener in our pkjs code using the Pebble.on
method:
// pkjs index.js

// On the phone, begin listening for a message from the smartwatch
Pebble.on('message', function(event) {
  // Get the message that was passed
  console.log(JSON.stringify(event.data));
});
Requesting Location
Our pkjs component can access to the location of the user's smartphone. The
Rocky.js component cannot access location information directly, it must request
it from pkjs.
In order to use this functionality, you must change your project settings in CloudPebble. Click 'SETTINGS' in the left menu, then tick 'USES LOCATION'.
In order to use this functionality, your application must include the
location flag in the
pebble.capabilities
array of your package.json file.
// file: package.json
// ...
  "pebble": {
    "capabilities": ["location"]
  }
// ...
Once we've added the location flag, we can access GPS coordinates using the
Geolocation API.
In this example, we're going to request the user's location when we receive the
"fetch" message from the smartwatch.
// pkjs index.js

Pebble.on('message', function(event) {
  // Get the message that was passed
  var message = event.data;

  if (message.fetch) {
    navigator.geolocation.getCurrentPosition(function(pos) {
      // TODO: fetch weather
    }, function(err) {
      console.error('Error getting location');
    },
    { timeout: 15000, maximumAge: 60000 });
  }
});
Web Service Calls
The pkjs side of our application can also access the
XMLHttpRequest
object. Using this object, developers are able to interact with external web
services.
In this tutorial, we will interface with Open Weather Map – a common weather API used by the Pebble Developer Community.
The XMLHttpRequest object is quite powerful, but can be intimidating to get
started with. To make things a bit simpler, we'll wrap the object with a helper
function which makes the request, then raises a callback:
// pkjs index.js

function request(url, type, callback) {
  var xhr = new XMLHttpRequest();
  xhr.onload = function () {
    callback(this.responseText);
  };
  xhr.open(type, url);
  xhr.send();
}
The three arguments we have to provide when calling our request() method are
the URL, the type of request (GET or POST) and a callback for when the
response is received.
Fetching Weather Data
The URL is specified on the
OpenWeatherMap API page, and contains the
coordinates supplied by getCurrentPosition() (latitude and longitude),
followed by the API key:
As of October 2015, an API key is required to fetch OpenWeatherMap data. These can be freely obtained from OpenWeatherMap.org.
var myAPIKey = '1234567';
var url = 'http://api.openweathermap.org/data/2.5/weather' +
          '?lat=' + pos.coords.latitude +
          '&lon=' + pos.coords.longitude +
          '&appid=' + myAPIKey;
All together, our message handler should now look like the following:
// pkjs index.js

var myAPIKey = '1234567';

Pebble.on('message', function(event) {
  // Get the message that was passed
  var message = event.data;

  if (message.fetch) {
    navigator.geolocation.getCurrentPosition(function(pos) {
      var url = 'http://api.openweathermap.org/data/2.5/weather' +
              '?lat=' + pos.coords.latitude +
              '&lon=' + pos.coords.longitude +
              '&appid=' + myAPIKey;

      request(url, 'GET', function(respText) {
        var weatherData = JSON.parse(respText);
        //TODO: Send weather to smartwatch
      });
    }, function(err) {
      console.error('Error getting location');
    },
    { timeout: 15000, maximumAge: 60000 });
  }
});
Finishing Up
Once we receive the weather data from OpenWeatherMap, we need to send it to the
smartwatch using Pebble.postMessage:
// pkjs index.js

// ...
request(url, 'GET', function(respText) {
  var weatherData = JSON.parse(respText);

  Pebble.postMessage({
    'weather': {
      // Convert from Kelvin
      'celcius': Math.round(weatherData.main.temp - 273.15),
      'fahrenheit': Math.round((weatherData.main.temp - 273.15) * 9 / 5 + 32),
      'desc': weatherData.weather[0].main
    }
  });
});
On the smartwatch, we'll need to create a message handler to listen for a
weather message, and store the information so it can be drawn on screen.
// rocky index.js
var rocky = require('rocky');

// Global object to store weather data
var weather;

rocky.on('message', function(event) {
  // Receive a message from the mobile device (pkjs)
  var message = event.data;

  if (message.weather) {
    // Save the weather data
    weather = message.weather;

    // Request a redraw so we see the information
    rocky.requestDraw();
  }
});
We also need to send the 'fetch' command from the smartwatch to ask for weather data when the application starts, then every hour:
// rocky index.js

// ...

rocky.on('hourchange', function(event) {
  // Send a message to fetch the weather information (on startup and every hour)
  rocky.postMessage({'fetch': true});
});
Finally, we'll need some new code in our Rocky draw handler to display the
temperature and conditions:
// rocky index.js
var rocky = require('rocky');
// ...
function drawWeather(ctx, weather) {
// Create a string describing the weather
//var weatherString = weather.celcius + 'ºC, ' + weather.desc;
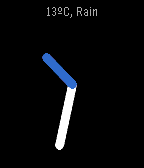
var weatherString = weather.fahrenheit + 'ºF, ' + weather.desc;
// Draw the text, top center
ctx.fillStyle = 'lightgray';
ctx.textAlign = 'center';
ctx.font = '14px Gothic';
ctx.fillText(weatherString, ctx.canvas.unobstructedWidth / 2, 2);
}
rocky.on('draw', function(event) {
var ctx = event.context;
var d = new Date();
// Clear the screen
ctx.clearRect(0, 0, ctx.canvas.clientWidth, ctx.canvas.clientHeight);
// Draw the conditions (before clock hands, so it's drawn underneath them)
if (weather) {
drawWeather(ctx, weather);
}
// ...
});
Conclusion
So there we have it, we successfully added web content to our JavaScript watchface! To do this we:
- Enabled
locationin ourpackage.json. - Added a
Pebble.on('message', function() {...});listener inpkjs. - Retrieved the users current GPS coordinates in
pkjs. - Used
XMLHttpRequestto query OpenWeatherMap API. - Sent the current weather conditions from the mobile device, to the
smartwatch, using
Pebble.postMessage(). - On the smartwatch, we created a
rocky.on('message', function() {...});listener to receive the weather data frompkjs. - We subscribed to the
hourchangeevent, to send a message topkjsto request the weather data when the application starts and every hour. - Then finally we drew the weather conditions on the screen as text.
If you have problems with your code, check it against the sample source code provided using the button below.
What's Next
We hope you enjoyed this tutorial and that it inspires you to make something awesome!
Why not let us know what you've created by tweeting @pebbledev, or join our epic developer community on Discord.